
When navigating through a website or app, users frequently encounter pop-ups that prompt them to take specific actions.
Pop-ups serve various purposes, such as conveying additional information or issuing warnings. For instance, if a user is filling out a form and misses a required field, a pop-up may appear to alert them.
Pop-ups can also assist users in confirming their actions.
These pop-ups can be classified into two groups based on how they are created:
- Native Pop-ups: Also known as Browser Alerts or Native Dialog Boxes, these pop-ups are provided by the browser itself. The browser offers developers a way to invoke these boxes through a JavaScript API. However, these native pop-ups have limited control and customization options for developers, making it challenging to style them as desired. They are termed ‘Blocking Alerts’ because they hinder the operation of the webpage, preventing any other tasks on the page until they are addressed. There are three main types of native pop-ups offered by browsers.
- Custom Pop-ups: Often referred to as “Modals,” these pop-ups are fully controlled and customized by the developer. Webpage developers have the flexibility to create and style them according to their preferences.
Types of native popups
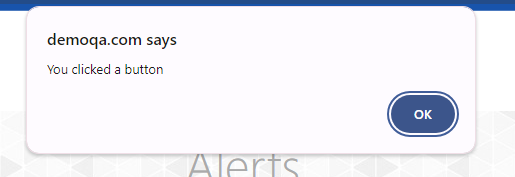
Alert
The alert() dialog presents a message box featuring an “OK” button. This box remains visible until the user clicks the “OK” button to dismiss the alert. It is commonly employed to notify users about specific information or changes, serving the purpose of providing important updates.
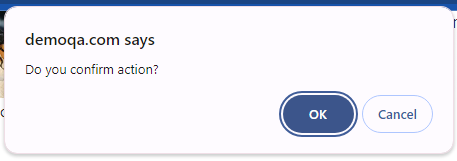
Confirmation
The Confirm Dialog displays two buttons, namely “OK” and “Cancel,” which can be likened to True and False. It provides users with the option to proceed with an intended action or cancel the action. Pressing either button will dismiss the dialog box.
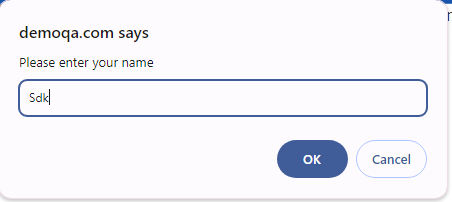
Prompt
The Prompt Dialog is employed in scenarios requiring additional text input from the user. It features a text field along with two buttons: “OK” and “Cancel.” The text entered by the user is returned upon clicking the “OK” button.
While the flexibility offered by Custom Popups has made them a popular choice for most modern apps, it is not uncommon to encounter native popups, especially when testing Legacy applications. Testers often find themselves dealing with both variations in order to ensure comprehensive testing coverage.
For testers, understanding how to effectively engage with these pop-ups during product testing and automation is crucial. This article will delve into the methods of interacting with these pop-ups using the Scandium test automation software.
Common Uses of Pop-ups
To enhance your understanding of this topic, let’s delve into the various uses of pop-ups
1. Notification Pop-ups
Notification pop-ups serve the purpose of informing users about important updates, messages, or events. For example, a notification can alert users about a new message, a system update, or an activity in their account.
2. Confirmation Modals
Confirmation modals are a type of native pop-up used to confirm or verify a user’s action before proceeding. For example, a modal may prompt the user to confirm the deletion of a file or the submission of a form.
3. Alert Dialogs
Alert dialogs serve the purpose of conveying essential information or issuing warnings to the user. An example of an alert dialog is one that communicates an error, such as an incorrect password or a network issue, providing crucial feedback to the user.
4. Lightbox Pop-ups
The purpose of a lightbox pop-up is to display additional content or media without navigating away from the current page. For example, clicking on an image thumbnail opens a lightbox pop-up featuring a larger view of the image.
5. Tooltip Pop-ups
This feature offers contextual information or hints about specific elements on the page. An example is hovering over an icon, which triggers the display of a tooltip providing a brief description of its function.
6. Form Modals
Form modals are native pop-ups used to collect user input or information through a form. Clicking on a “Sign Up” button opens a form modal for users to fill in their registration details.
7. Onboarding Guides
This type of pop-up is used to guide new users through the features and functionalities of an application. For example, a series of pop-ups can introduce users to key features during their first visit.
8. Rating and Feedback Pop-ups
These are employed to collect user feedback or prompt users to rate the application. For instance, after completing a task, a pop-up prompts users to rate their experience or provide feedback.
9. Cookie Consent Banners
This type of pop-up is employed to notify users about the usage of cookies on the website and to obtain their consent. An example is a banner positioned at the bottom or top of the page, prompting users to either accept or manage their cookie preferences.
10. Exit Intent Pop-ups
This is employed to retain users or prompt specific actions as they attempt to exit the website. An example is a pop-up that offers a discount or additional content when a user moves the cursor towards the browser’s close button.
These are just a few examples, and the specific types of native pop-ups can vary based on the application’s needs and the user interface design.
Steps on How To Interact with Native Pop-ups Using Scandium
1. Visit app.getscandium.com and log in to your dashboard. If you don’t have an account yet, feel free to create one for free.
2. Paste the URL of the website you intend to test into the provided dialog box on your dashboard.
3. Click on “record”.
4. If there’s a specific button on your website that triggers the appearance of a pop-up, proceed to click on that button.
5. Actively engage with the pop-up, performing any necessary actions such as clicking “OK.” Scandium will record these interactions.
6. Assert that the pop-up appeared during the test by clicking on the green check icon.
7. Assert against the content in the pop-up message. Use the “Page Assertion” from the select options drop-down menu.
8. Select the “Assert page contains text” option.
9. Paste the expected text into the “text to find” dialog box.
10. Save the assertion by clicking on “save assertion.”
11. Stop your recording and initiate the replay by clicking on “run.”
12. Scandium will autonomously run the test for you.
These steps provide a straightforward guide on interacting with native pop-ups on your website during testing with Scandium. Experience the benefits of Scandium today by creating an account on getscandium.com and commence your automated testing journey for FREE.